Battle of Tarawa
| Battle of Tarawa | |||||||
|---|---|---|---|---|---|---|---|
| Part of World War II, Pacific War | |||||||
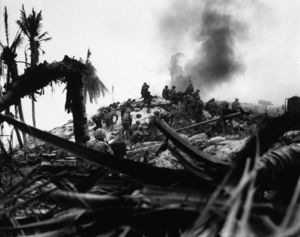 Lt Alexander Bonnyman (4th from right) and his assault party storming a Japanese stronghold. Bonnyman received the Medal of Honor posthumously. |
|||||||
|
|||||||
| Belligerents | |||||||
| Commanders and leaders | |||||||
| Strength | |||||||
| 35,000 troops | 3,000 troops, 1,000 Japanese and 1,200 Korean laborers |
||||||
| Casualties and losses | |||||||
| U.S Marine Corps: 1,000 killed[1] 2,296 wounded[1] U.S Navy: 687 killed[1] |
All but 146 of 5,000 killed[2] 17 Japanese and 129 Koreans captured |
||||||
|
|||||


The Battle of Tarawa was a battle in the Pacific Theatre of World War II, largely fought from November 20 to November 23, 1943. It was the second time the United States was on the offensive (the Guadalcanal Campaign had been the first), and the first offensive in the critical central Pacific region.
It was also the first time in the war that the United States faced serious Japanese opposition to an amphibious landing. Previous landings met little or no initial resistance. The 4,500 Japanese defenders were well-supplied and well-prepared, and they fought almost to the last man, exacting a heavy toll on the United States Marine Corps.
American casualties on the beach was so severe that over a hundred corpses were never repatriated.[3] Staff Sgt Norman T. Hatch, a combat cameraman who filmed the bodies on the beach, produced images that were so disturbing that he had to obtain permission from President Franklin Roosevelt before they could be shown to the public.[3] The footage was included in the 1944 short documentary With the Marines at Tarawa, and was the only film to contain gruesome scenes of American dead up to that date.[4]
Contents |
Background
In order to set up forward air bases capable of supporting operations across the mid-Pacific, to the Philippines, and into Japan, the U.S. needed to take the Marianas Islands. The Marianas were heavily defended, and in order for attacks against them to succeed, land-based bombers would have to be used to weaken the defenses. The nearest islands capable of supporting such an effort were the Marshall Islands, northeast of Guadalcanal. Taking the Marshalls would provide the base needed to launch an offensive on the Marianas but the Marshalls were cut off from direct communications with Hawaii by a garrison on the small island of Betio, on the western side of Tarawa Atoll in the Gilbert Islands. Thus, to eventually launch an invasion of the Marianas, the battles had to start far to the east, at Tarawa.
The Japanese forces were well aware of the Gilberts' strategic location and had invested considerable time and effort fortifying the island. The 7th Sasebo Special Naval Landing Force of 2,619 men under the command of Commander Takeo Sugai was an elite Japanese marine unit. This unit possessed 14 Type 95 light tanks led by Ensign Ohtani. In order to bolster the defenses, the 1,247 men of the 111th Pioneers (similar to American Seabees) along with the 970 men of the Fourth Fleet's construction battalion were brought in; approximately 1,200 of the men in these two groups were Korean forced laborers. A series of fourteen coastal defense guns, including four Vickers 8-inch guns bought from the British during the Russo-Japanese War,[5] were located around the island and placed in concrete bunkers. A total of 500 pillboxes, "stockades" built from logs, and forty artillery pieces were scattered around the island. An airfield was cut into the bush along the high point of the island. Trenches connected all points of the island, allowing troops to move where needed under cover. Kaigun Shōshō Keiji Shibazaki, who commanded the garrison, had boasted that "it would take one million men one hundred years" to conquer Tarawa.
Betio is shaped roughly like a long, thin triangle, with the point to the east and the base on the west. The lagoon of the atoll lies to the north and east, with the entire northern coast of the island in the shallow waters of the atoll, and the southern and western sides in deeper waters. An attack would almost certainly have to approach from the lagoon; the deeper waters on the south offered no reasonable landing areas. In order to prevent this, a huge wall was constructed across the lagoon just in from the high water mark, behind which a series of machine gun posts and pillboxes could fire on anyone trying to get over the wall. A long pier was constructed pointing north from the western end of the island, allowing cargo ships to be unloaded out past the reefs and shallow waters, while still allowing them to anchor in the protected waters of the shallow lagoon.
The battle
November 20
The American invasion force was the largest yet assembled for a single operation in the Pacific, consisting of 17 aircraft carriers (6 CVs, 5 CVLs, 6 CVEs), 12 battleships, 8 heavy and 4 light cruisers, 66 destroyers, and 36 transports. The force carried the 2nd Marine Division and a part of the Army's 27th Infantry Division, for a total of about 35,000 soldiers and Marines.
The naval forces opened fire on November 20, 1943, shelling continually for over an hour and a half, stopping only briefly to allow dive bombers from the carriers to operate against fixed positions. Most of the larger Japanese guns were knocked out during this period. The island was at most points only a few hundred yards wide and the bombardment turned much of it into rubble. By the time of the invasion it was thought that no one would remain to defend what was left of the tiny island.
The attack plan consisted of three major beaches, Red 1 through Red 3, along the northern coast of the island; Red 1 on the extreme west at the "toe" of the island and Red 3 to the east against the pier. Beaches Green and Black were the western base and southern shore respectively, and not considered suitable for initial landings. The airstrip, running roughly east-west, divided the island into north and south.
The Marines started their attack on the lagoon at 09:00, later than expected, and found themselves stuck on a reef some 500 yards (460 m) off shore. Marine battle planners had allowed for Betio's neap tide and expected the normal rising tide to provide a water depth of 5 feet (1.5 m) over the reef, allowing larger landing craft, with drafts of at least four feet (1.2 m), to pass with room to spare. But that day and the next, in the words of some observers, “the ocean just sat there,” leaving a mean depth of three feet (0.9 m) over the reef. (The neap tide phenomenon occurs twice a month when the moon is near its first or last quarter, because the countering tug of the sun causes water levels to deviate less. But for two days the moon was at its farthest point from earth and exerted even less pull, leaving the waters relatively undisturbed.)
When the supporting naval bombardment stopped to allow the Marines to land, the Japanese emerged from the deep shelters where they had sheltered from the naval gunfire and quickly manned their emplaced gun positions. The Navy boats caught on the reef were soon set on fire by the Japanese artillery and mortar fire. Troops jumped out of the boats and started making their way ashore, under machine gun fire the entire time. The small number of Amtrac amphibious tractors were able to make it over the reef, with some difficulty, but many were knocked out by larger guns as they climbed over the reef, and half of the Amtracs were out of action by the end of the day. The first assault wave was only able to land a few men, who were pinned down against the log wall on the beach.
Several early attempts to land tanks and break through the wall failed when the landing craft were hit on the run in and either sank or had to withdraw while taking on water. Two tanks eventually landed on the east end of the beach but were knocked out of action fairly quickly. Another three tanks were able to land on the western end and helped push the line in to about 300 yards (270 m) from shore, but one of these fell into a shell hole and another was taken out by a magnetic mine. The remaining tank was used as a portable machine gun pillbox for the rest of the day. A third platoon was able to land all four of their tanks on Red 3 around noon and operate successfully for much of the day, but by the end of the day only one tank was still operable.
By noon the Marines had successfully taken the beach as far as the first line of Japanese defenses. By 15:30 the line had moved inland in places but was still generally along the first line of defenses. The arrival of the tanks started the line moving on Red 3 and the end of Red 2 (the right flank, looking south towards the island), and by nightfall the line was about half-way across the island, only a short distance from the main runway.
During the later hours the Japanese defenders continued harassing fire. In one action, a Japanese Marine swam out to one of the disabled amtracs and brought its .50-caliber (12.7mm) M2 machine gun into action against the rear of the U.S. Marine lines. By the time U.S. forces retook the vehicle, several men had been injured or killed.
November 21

With the Marines holding a line on the island, the second day turned to cutting the Japanese forces in two, by expanding the bulge near the airfield until it reached the southern shore. Meanwhile the forces on Red 1 were instructed to secure Green beach, the entire western end of the island.
In the end, taking Green proved somewhat easier than expected. With heavy resistance all through the area, the commander decided to avoid direct combat and instead called in naval fire from offshore. Inching their way forward during the day, the artillery spotters were able to take out machine gun posts and remaining defenses. After the fire stopped, the troops were able to take the positions in about an hour with few losses.
Operations along Red 2 and Red 3 were considerably more difficult. During the night the defenders had set up several new machine gun posts between the closest approach of the forces from the two beaches, and fire from those machine gun nests cut off the American forces from each other for some time. By noon the U.S. forces had brought up their own heavy machine guns, and the Japanese posts were put out of action. By the early afternoon they had crossed the airstrip and had occupied abandoned defensive works on the south side.
Around 12:30 a message arrived that some of the defenders were making their way across the sandbars from the extreme eastern end of the islet to Bairiki, the next islet over. Portions of the 6th Marines were then ordered to land on Bairiki to seal off the retreat path. They formed up, including tanks and pack artillery, and were able to start their landings at 16:55. They received machine gun fire, so aircraft were sent in to try to locate the guns and suppress them. The force landed with no further fire, and it was later found that only a single pillbox with 12 machine guns had been set up by the forces that had been assumed to be escaping. They had a small tank of gasoline in their pillbox, and when it was hit with fire from the aircraft the entire force was burned. Meanwhile other units of the 6th were sent onto Green north (near Red 1).
By the end of the day, the entire western end of the island was in U.S. control, as well as a fairly continual line between Red 2 and Red 3 around the airfield aprons. A separate group had moved across the airfield and set up a perimeter on the southern side, up against Black 2. The groups were not in contact with each other, with a gap of over 500 yards (460 m) between the forces at Red 1/Green and Red 2, and the lines on the northern side inland from Red 2/Red 3 were not continuous. Nevertheless it is at this point, as seen in retrospect, that the U.S. began to gain the advantage.
The atoll commander, Kaigun Shōshō Keiji Shibazaki, was killed in his concrete command post, complicating Japanese command issues.
November 22

The third day of the battle consisted primarily of the consolidation of existing lines and the moving onshore of additional heavy equipment and tanks. During the morning the forces originally landed on Red 1 made some progress towards Red 2 but at some cost. Meanwhile the units of the 6th Marines landed on Green to the south of Red 1 formed up while the remaining battalion of the 6th landed.
By the afternoon the 1st Battalion 6th Marines was sufficiently organized and equipped to take the offensive. At 12:30 they started and were soon pursuing the Japanese forces across the southern coast of the island. By the late afternoon they had reached the eastern end of the airfield and formed a continuous line with the forces that had landed on Red 3 two days earlier.
By the evening the U.S. clearly had the upper hand. The remaining Japanese forces were either squeezed into the tiny amount of land to the east of the airstrip, or located in several pockets near Red 1/Red 2 or near the eastern edge of the airstrip.
Realizing this, the Japanese forces formed up for a counterattack, which started at about 19:30. Small units were sent in to infiltrate the U.S. lines in preparation for a full-scale assault but were beaten off by concentrated artillery fire, and the assault never took place. Another attempt was made at 23:00 and made some progress.
November 23

At 0400 the Japanese attacked Major Jones' 1/6 in force. Roughly 300 Japanese troops launched a banzai charge into the lines of A and B Companies. Receiving support from 1/10's 75mm pack howitzers and the destroyers USS Schroeder and USS Sigsbee, the Marines were able to beat back the attack but only after calling artillery to within 75 meters of their lines. [6] When the assault ended about an hour later there were 200 dead Japanese soldiers in the Marine front lines and another 125 beyond their lines. At 0700 Navy fighters and dive bombers started softening up the Japanese positions on the eastern tip of the island. After 30 minutes of air attack the pack howitzers of 1/10 opened up on the Japanese positions. Fifteen minutes later the Navy kicked off the last part of the bombardment with a further 15 minutes of shelling. At 0800 3/6 under the command of Lt. Col. McLeod attacked, Jones' 1/6 having been pulled off the line after suffering 45 killed and 128 wounded in the previous night's fighting. Due to the narrowing nature of the island, I and L Companies of 3/6 formed the entire Marine front with K Company in reserve. The Marines advanced quickly against the few Japanese left alive on the eastern tip of Betio. They had two Sherman tanks (the Colorado and the China Gal), 5 light tanks in support and engineers in direct support. [7]
I and L Companies advanced 350 yards before experiencing any serious resistance. This resistance came in the form of a number of connected bunkers on I Company's front. Lt. Col. McLeod ordered L Company to continue their advance, thereby bypassing the Japanese position. At this point L Company made up the entire front across the now 200 yard wide island, while I Company reduced the Japanese strong point with the support of the Colorado and attached demolition/flame thrower teams provided by the engineers. As the I Company Marines closed in the Japanese broke from cover and attempted to retreat down a narrow defile. Alerted to the attempted retreat, the commander of the Colorado fired directly down the line of fleeing soldiers. The near total destruction of the Japanese soldier's bodies made it impossible to know how many men were killed by this single shot but it was estimated that 50 to 75 men perished. While 3/6's L Company advanced down the eastern end of the island, Major Schoettel's 3/2 and Major Hay's 1/8 were cleaning out the Japanese pocket that still existed between Beaches Red 1 and Red 2. This pocket had been giving the Marines landing on Red 1 and Red 2 hell since D-day and they were finally moving in to reduce it. [8]
1/8 advanced from the East (Red 2) while 3/2 advanced from the West (Red 1). Major Hewitt Adams led an infantry platoon supported by two pack howitzers from the lagoon into the Japanese positions to complete the encirclement. By noon the pocket had been reduced. Back on the eastern end of the island 3/6's L Company continued to advance, bypassing pockets of resistance and leaving them for the tanks, engineers and air support. By 1300 they had reached the eastern tip of Betio. 3/6 killed roughly 475 Japanese soldiers on the morning of D+3 while only losing 9 killed and 25 wounded. Back at the Red 1/Red 2 pocket there was no accurate count of Japanese dead. There were an estimated 1,000 Japanese alive and fighting on the night of D+2, 500 on the morning of D+3 and only 50-100 left when the island was declared secure at 1330 D+3. [9]


Aftermath
For the next several days the 2nd Battalion 6th Marines landed on Bairiki, moved up the remaining islands in the atoll to clean up, completing this on November 28. Portions of the 2nd Marine Division started leaving soon after and were completely withdrawn by early 1944.
Only one Japanese officer, 16 enlisted men and 129 Koreans were alive at the end of the battle. Of the 4,836 Japanese and Korean laborers that made up the garrison, 4,690 were killed.[10] The 2nd Marine Division suffered 894 (48 officers and 846 men) killed in action, with another 84 (8 officers and 76 men) later dieing of their wounds. A further 2,188 (102 officers and 2,086 men) men were wounded. Of the roughly 12,000 2nd Marine Division Marines on Tarawa, 3,166 officers and men became casualties. [11] Nearly all of these casualties were suffered in the 76 hours between H-Hour+10 Minutes, 0910 20 November, and the island of Betio being declared secure at 1330 23 November.[12]
These heavy casualties sparked off a storm of protest[13] in the United States, where the high losses[14] could not be understood for such a tiny and seemingly unimportant island in the middle of nowhere. Writing after the war, Marine General Holland M. Smith asked,
"Was Tarawa worth it?" "My answer," he said, "is unqualified: No. From the very beginning the decision of the Joint Chiefs to seize Tarawa was a mistake and from their initial mistake grew the terrible drama of errors, errors of omission rather than commission, resulting in these needless casualties." Thought Smith, "[We] should have let Tarawa 'wither on the vine.' We could have kept it neutralized from our bases on Baker Island, to the east, and the Ellice and Phoenix Islands, a short distance to the southeast.[15]
The losses at Tarawa can be explained by the difficulty of coordinating combined amphibious operations, one of the most demanding military missions. At the time, Tarawa[16] was the most heavily defended atoll invaded by Allied forces in the Pacific. But the lessons learned at Tarawa would be applied in the Battle of Iwo Jima.
See also
- USS Tarawa, for U.S. Navy ships named for the Battle of Tarawa
- With the Marines at Tarawa, a 1944 short documentary directed by Louis Hayward, which won the 1945 Academy Award for Best Documentary Short Subject.
References
Notes
- ↑ 1.0 1.1 1.2 Wright 2001, p. 93.
- ↑ Wright 2001, p. 94
- ↑ 3.0 3.1 "Return to Tarawa". The Tokyo Reporter. 2009-09-14. http://www.tokyoreporter.com/2009/09/14/return-to-tarawa/. Retrieved 2010-04-22.
- ↑ "WWII Combat Cameraman: 'The Public Had To Know'". NPR.org. 2010-03-22. http://www.npr.org/templates/story/story.php?storyId=124631492. Retrieved 2010-04-22.
- ↑ "ACROSS THE REEF: The Marine Assault of Tarawa". Colonel Joseph H. Alexander, USMC (Ret). http://www.nps.gov/archive/wapa/indepth/extContent/usmc/pcn-190-003120-00/sec4.htm. Retrieved 2010-04-28.
- ↑ Johnston, Richard (1948). Follow Me!: The Story of The Second Marine Division in World War II, p. 146. Random House of Canada Ltd, Canada.
- ↑ Johnston, Richard (1948). Follow Me!: The Story of The Second Marine Division in World War II, p. 147. Random House of Canada Ltd, Canada.
- ↑ Johnston, Richard (1948). Follow Me!: The Story of The Second Marine Division in World War II, p. 149. Random House of Canada Ltd, Canada.
- ↑ Johnston, Richard (1948). Follow Me!: The Story of The Second Marine Division in World War II, p. 150. Random House of Canada Ltd, Canada.
- ↑ "Japanese Casualties from The Battle for Tarawa, USMC Historical Monograph". ibiblio at University of North Carolina - Chapel Hill. http://www.ibiblio.org/hyperwar/USMC/USMC-M-Tarawa/USMC-M-Tarawa-C.html. Retrieved 2010-03-23.
- ↑ Johnston, Richard (1948). Follow Me!: The Story of The Second Marine Division in World War II, p. 164, 305. Random House of Canada Ltd, Canada.
- ↑ Johnston, Richard (1948). Follow Me!: The Story of The Second Marine Division in World War II, p. 111. Random House of Canada Ltd, Canada.
- ↑ "The Significance of Tarawa from Across the Reef: The Marine Assault of Tarawa". National Park Service. http://www.nps.gov/archive/wapa/indepth/extcontent/usmc/pcn-190-003120-00/sec8.htm. Retrieved 2010-03-23.
- ↑ "Marine Casualties from The Battle for Tarawa, USMC Historical Monograph". ibiblio at University of North Carolina - Chapel Hill. http://www.ibiblio.org/hyperwar/USMC/USMC-M-Tarawa/USMC-M-Tarawa-B.html. Retrieved 2010-03-23.
- ↑ Smith 1949, pp. 111-112.
- ↑ "Chronology of Events at Tarawa from The Battle for Tarawa, USMC Historical Monograph". ibiblio at University of North Carolina - Chapel Hill. http://www.ibiblio.org/hyperwar/USMC/USMC-M-Tarawa/USMC-M-Tarawa-D.html. Retrieved 2010-03-23.
Bibliography
- Smith, General Holland M., USMC (Ret.) (1949), Coral and Brass, Washington, D.C.: United States Marine Corps, OCLC 5170569, http://ibiblio.net/hyperwar/USMC/Coral&Brass/index.html, retrieved 2008-09-21.
- Wright, Derrick (2001), Tarawa 1943, Oxford: Osprey History, ISBN 1841762725.
Further reading
- Alexander, Joseph H. (1995). Utmost Savagery: The Three Days of Tarawa. Naval Institute Press.
- Graham, Michael B (1998). Mantle of Heroism: Tarawa and the Struggle for the Gilberts, November 1943. Presidio Press. ISBN 0891416528.
- Gregg, Howard F. (1984). Tarawa. Sein and Day. ISBN 0-8128-2906-9.
- Hammel, Eric; John E. Lane (1998). Bloody Tarawa. Zenith Press. ISBN 0-76032-402-6. http://books.google.com.ua/books?id=LZC0eX8CEZMC&pg=PP1&dq=inauthor:%22Eric+M.+Hammel%22&hl=en&cd=6#v=onepage&q=&f=true.
- Russ, Martin (1975). Line of Departure: Tarawa. Doubleday. ASIN B0015T5R3U.
- Wukovitz, John (2007). One Square Mile of Hell: The Battle for Tarawa. NAL Trade. ISBN 0451221389..
External links
- Tarawa on The Web
- Animated History of The Battle of Tarawa
- "Defense of Betio Island," Intelligence Bulletin, U.S. War Department, March 1944.
- - The Assault of the Second Marine Division on Betio Island, Tarawa Atoll, 20-23 November, 1943
- Timeline of the Battle
- Eyewitnesstohistory.com - The Bloody Battle of Tarawa
- Marines in World War II Historical Monograph: The Battle for Tarawa
- U. S. Army at Tarawa
- Heinl, Robert D., and John A. Crown (1954). "The Marshalls: Increasing the Tempo". USMC Historical Monograph. Historical Division, Division of Public Information, Headquarters U.S. Marine Corps. http://www.ibiblio.org/hyperwar/USMC/USMC-M-Marshalls/index.html. Retrieved 2006-12-04.
- United States Strategic Bombing Survey (Pacific), Naval Analysis Division (1946). "Chapter IX: Central Pacific Operations From 1 June 1943 to 1 March 1944, Including the Gilbert-Marshall Islands Campaign". The Campaigns of the Pacific War. United States Government Printing Office. http://www.ibiblio.org/hyperwar/AAF/USSBS/PTO-Campaigns/USSBS-PTO-9.html. Retrieved 2007-06-11.
- "Tarawa" cat survivor adopted by US Coast Guard
- Oral history interview with John E. Pease, a U.S. Marine Veteran who took part in the Battle of Tarawa from the Veterans History Project at Central Connecticut State University
- National Archives historical footage of the battle for Tarawa